


 Forums Forums
StrategyFirst.com

|
 |
Doctrines |
|
 |
|
Gameplay Basics
Please select a section from this submenu for more details.

|
Doctrines define the general reaction of a unit, or group of units, when they encounter an enemy in a given situation. Some doctrines will immediately send the units into combat, while others will dictate that they flee.
A doctrine can also determine whether ships will fight to the bitter end or retreat when a certain amount of damage has been sustained. Each unit or formation can have its own doctrine. Note that unarmed vessels can have any doctrine.
Use the Doctrine Action box at the top of the Main Screen to select a doctrine or create a custom doctrine.
The Doctrine Action box
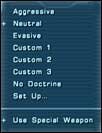 Scroll up and down in the Doctrine menu to create a set of commands that you wish to issue to a group of your ships. Scroll up and down in the Doctrine menu to create a set of commands that you wish to issue to a group of your ships.
Note also the option at the bottom of the Doctrine Action box:
- Special Weapon: When this option is selected, units will fire missiles and torpedoes at will. If you do not want your units to fire these weapons, deselect this option.
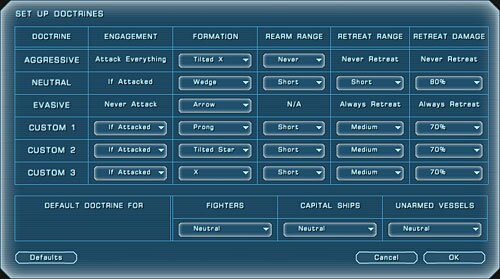
Unless you select Set Up... (the custom command option), your group will automatically be configured according to the following criteria:
Rules of Engagement
Defines how your group will react when confronted by enemies. There are seven types of Engagement:
- Aggressive: Ships following this approach will always attack anything within sensor range, and will continue to attack until destroyed or defeated. Retreat is simply not an option. Indeed, even unarmed ships will continue with their tasks if attacked by enemy vessels.
- Neutral: Ships following this approach will engage the enemy only if attacked first. They will also attack if a nearby allied ship is being molested. Battle will continue until the melee drifts beyond twice the ships� passive sensor range. Ships fighting under Neutral Rules of Engagement will retreat according to the selected Retreat doctrine. Unarmed allied ships will continue their tasks even while enemy ships are in close proximity, but will retreat if attacked.
- Evasive: Ships following this approach will flee, and will only fight if attacked. Battle will be engaged in order to protect slower allied ships which will be bearing the brunt of enemy fire as the group retreats. Unarmed ships will immediately retreat when enemy ships enter their sensor range.
- Always: Ships following this protocol will always attack, though they will break off the melee if fighting continues beyond twice their passive sensor range. Ships will retreat according to the selected Retreat doctrine. Unarmed ships will retreat only when a certain amount of damage has been sustained (as defined by Retreat Damage, below).
- If Attacked: Ships will only engage in battle if they or a nearby allied ship are under attack. Unarmed ships will proceed with their tasks, and will only retreat if attacked.
- If Stronger: Computer calculations will determine which of the two parties � factoring in the strength of nearby allies � is stronger. If your strength is greater, your group of vessels will attack.
- Never: Your ships always retreat. Unarmed ships retreat when enemy vessels enter their sensor range.
Keep in mind that, unless specific orders are issued, combat will play out automatically. Results will depend on the selected units and doctrine.
Formation Options
Defines the configuration of a selected group of ships. If you assign a different formation to a single ship, that ship will break off from the formation and follow its new order. You can create formations using ships of different types.
For example, Light Fighters can join Heavy Fighters in the same formation. However, during combat, these mixed formations will break up, with units of the same type grouping together in order to take advantage of their special capabilities.
Capital Ships cannot join any formation due to their massive size and minimal maneuverability.
There are six possible formations:
- Tilted Star
- X
- Prong
- Arrow
- Tilted X
- Wedge
Each formation has its own advantages (such as more focused fire) and disadvantages (such as increased susceptibility to enemy fire). Experiment with the various formations to determine which ones work best in a given situation. Traveling formations are usually larger than Combat formations. If a traveling squad engages in battle, its formation will divide into smaller groups.
To create a formation, click and drag around the ships that you wish to include, and then select �Make Formation� from the Action Box. To break a formation, select �Break Formation� from the Action Box.
Refit Range
Defines the distance from an available allied unit capable of re-supplying ships (such as a Base or Carrier) to which a formation will travel. For example, if you have selected Medium, and a Base is within 50,000 Units, your ships will withdraw from battle and fly to the Base for refitting.
- Never: Units never disengage in order to refit
- Short: 10,000 Units
- Medium: 50,000 Units
- Long: 200,000 Units
- Always: Units leave battle to refit regardless of the distance to the nearest Base or Carrier
Retreat Damage:
You can set the amount of damage you are willing to have your units sustain before they will retreat:
- 100% (in other words, units will not retreat)
- 90%
- 80%
- 70%
- 60%
- 50%
Retreat Range
Defines the distance that retreating units are willing to travel when sufficient damage has been sustained. Select from one of five Retreat Range options:
- Never: Units never retreat from battle.
- Short: Units will retreat only if a Base, Carrier, or Nav Point is within 15,000 Units.
- Medium: Units will retreat only if a Base, Carrier, or Nav Point is within 20,000 Units.
- Long: Units will retreat only if a Base, Carrier, or Nav Point is within 30,000 Units.
- Always: Units will retreat regardless of the distance to the nearest Base, Carrier, or Nav Point.
Pre-Set Doctrines
If you do not wish to use the Set Up option to create your own custom doctrine, you can select one of the pre-set doctrines from the Doctrine action box.
If you select �No Doctrine� from the Doctrine action box, you will need to issue all orders directly to your units.
|
|
|
|
|
Copyright © 2002 Strategy First Inc. All Rights Reserved.
|
