

 Forums Forums
 StrategyFirst.com StrategyFirst.com


|
 |
O.R.B. Basic Cinematics Tutorial |
 |
|
Part 1: Section Name
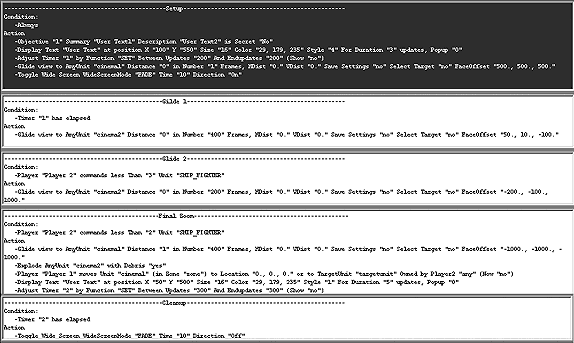
We�ll assume you�ve already learned how to make an eye-catching environment for your map, and now you�re looking to add a bit of cinematic flare. The way O.R.B. is designed, you may use different standards of text size, position, and even color, but this tutorial will use the same standards as our designers. This is what your trigger list will end up looking like after this tutorial:

Most O.R.B. maps begin with an introduction to the sector. This is optional, of course, but it adds an easy tool for setting the mood. Just remember to be creative!
First, go to Events in the top menu bar, and then Triggers.
You will see Player 1 and Player 2 at the top of the Trigger menu. These are used for sorting your events, should you choose to add different events for each player. For this tutorial, we will use Player 1. You will choose your player when we add an event, so for now click on New. Now put a checkmark in the Player 1 box and click OK. Click New again.
You will now see a list of conditions to make this event occur. Since we want this to occur first thing in the map, choose ALWAYS from the pulldown menu and click OK. You can add multiple conditions for an event to occur, but the first trigger is usually the �Set Up� event. Because it is an unconditional �always,� it occurs as soon as the map begins. When you are finished, click on Next.
Click on New to begin creating actions. Now you will see a pulldown menu with a huge amount of actions. It will take a while to learn what each does, but a little practice will have you attempting new feats the O.R.B. designers have never tried. Choose Display Text. You should now see a statement in the box with several blue links. You will need to fill information into these blanks before you can continue. But hey, that�s why you are here anyway! Stop fighting the system!
First, click on the User Text link. A �New Action� box should appear. This is where you will type your sector name. Click in the box and type in the sector and title of your choice. As an example, you can use �Training Sector: The Tutorial.� Next, click OK.
You should see X and Y coordinates, represented by blue links. These are the actual coordinates where your text will be placed on the screen. The standard location used in O.R.B. is in the lower lefthand corner of the screen. Click on posx and enter 100 as the value, then click OK. Next, click on posy and enter 500 as the value, then click OK.
Click on size. Enter the value 16 and click OK.
Click on color. Enter the three values, from top to bottom, 29 179 235. Click OK.
Click on style. The style will change how the text is displayed on the screen. This can vary from paragraph style, text box style, or even line-by-line dramatic division of your text. For now we will use style 4 to display the text paragraph style. We will get to other styles later in the tutorial. Click OK when you have entered the value.
Updates will determine how long the text displays on the screen before erasing itself (note that any other text will erase the previous text as well). Click on updates. Enter a value of 3. This will give the sector name a short amount of time onscreen. Next, click OK.
Popup was used for internal purposes, and should have no effect on your trigger. Click on yes/no and change the value to no. Then click OK.
Click OK again. Now your first trigger should be complete. Click OK once again to return to the game screen. Now would be a good time to save your work, choose File and then Save As to back up your map.
Now make sure you are in 3D view, choose File and then Test. You should enter testing mode, and the game should be running in realtime (you should also see flashing words at the top of the screen). If everything was entered correctly, you should see your sector name appear and vanish in a few seconds in the lower left corner of the screen. Press Esc to exit this mode and return to editing.
|
|
 |
 |
|

Copyright © 2002 Strategy First Inc. All Rights Reserved.
|

