


 Forums Forums
StrategyFirst.com

|
 |
O.R.B. Environment Tutorial |
|
|
Starting with a Blank World
Start up ORBEdit by choosing the appropriate executable in either your start menu or your ORB directory. After the initial loading you should see the typical ORB interface surrounding your view as well as a new menu bar at the top where all of ORBEdit�s options can be found.
Since this Tutorial introduces you to the environmental part of map making, establishing the actual playable area should be your first task. This will help you to choose where to put those asteroids, how big they can be and what not to put in that playable area.
At the time of writing of this tutorial, you must create your playable area on the 2D map. Go to the 2D map view by pressing the space bar.
Once you are in 2D Map mode, open the Environment Dropdown menu by clicking on Environment. Then click on Playable Area.
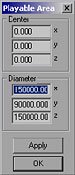 |
This Dialog box should appear.
Center should remain at the default value of 0-0-0. This represents where the center of the playable area will be in relation to ORB�s universe.
In the Diameter fields, enter 150000 for X, 90000 for Y and 150000 for Z. This will give you a rather small playable area, the maximum size you can give to your playable area is 500000, 150000, 500000. Any bigger and ORB doesn�t like it too much, it might even tell you so.
Click OK after entering those numbers.
|
Another thing to note, if we take ORB�s world coordinates into account, Y represents height. This holds true in most cases. So if you are trying to adjust by hand the height of something, remember it�s with Y.
Tip: Another way to make a playable area is by drawing one with your mouse. Simply press and hold the P key on your keyboard, and drag a box on your 2D map by pressing down on the left mouse button and dragging away until you get the right size. This only sets the X and Z scale correctly; you will still need to adjust the Y height in the dialog box afterwards.
In your 2D map view, you should now see a green, dotted rectangle representing your playable area. Go back to the 3D view now by pressing space bar again. Back in the 3D view, the only way you can currently see the playable are is by pressing CTRL, which brings up the grid showing you the playable area. You can also activate a Playable area �wire box� that gives you a much better idea of what you have.
Let�s do that.
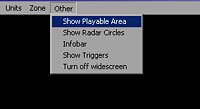 |
In the Top menu bar, click on Other and then click on Show Playable Area. And voila, there should now be a green wire frame box displayed representing your playable area.
Now enough with the Playable area already! Let�s fill this void! The first thing you NEED to add to your world is a source of light, a sun.
|
|
|
|
|
|
Copyright © 2002 Strategy First Inc. All Rights Reserved.
|
