


 Forums Forums
StrategyFirst.com

|
 |
O.R.B. Environment Tutorial |
|
|
Creating an Asteroid Group
We will make a small, tilted asteroid belt around our moon, to do this open up the asteroid creation window by going to the top menu and clicking: Environment > Asteroid Field.
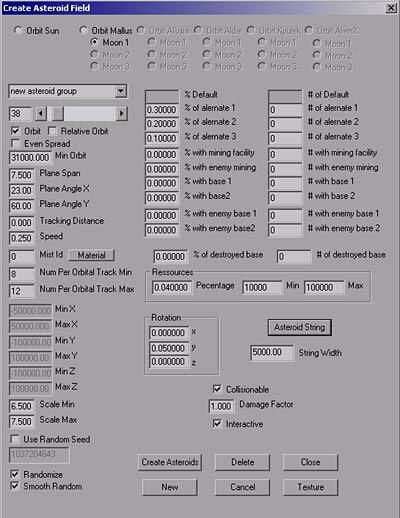
At the top of this window there is a list of available bodies to orbit around, you should have a choice between the Sun, Mallus and Moon 1. Click the Moon 1 button.
Where new asteroid group is written is where you can give a name to your belt, you first need to create the asteroid belt, then return to the asteroid field creation window and just change that name to whatever you wish. You should get used to naming your belts otherwise it can become rather confusing when you have many.
Right under the new asteroid group field is a sliding bar with a number beside it. That is the amount of asteroids that are in your belt, by default that number is 200. Since we want a small belt, put 38 as the amount of asteroids.
Right under the asteroid amount field is the Orbit check box and orbit options.
Relative orbit makes the asteroid belt spin in accordance to rotational value of the body it orbits around. Example: your moon has some rotational value on it, if you check relative orbit, the asteroid belt will also spin as your moon rotates, even if you didn�t give any orbit speed to your belt.
Even Spread will spread out the asteroids in even patches on the belt. This can prevent any �clumping� in your belt; every one has its place.
Check Orbit if it isn�t checked, but leave the two other options unchecked.
Next is Min Orbit, this lets you set the minimum orbit of your belt. By default it�s pretty large, 135000. That�s just too big for our map, change that to 31000 instead.
Plane Span adds height in a way to your belt. If the Plane Span is at zero, all the asteroids will be on the same �level�, the bigger the value you give to Plane Span the more the belt will �wrap around� it�s orbiting reference. This way you can have a sphere of asteroids with a planet in the middle. For now, leave Plane Span at its default value.
Plane Angle X and Plane Angle Y are the two fields you will need to use to give an angle to your belt. First try adjusting the X plane, other wise you might not notice any change initially. In the Plane Angle X field, put 23.00. Then in the Plane Angle Y field, put 60.00.
Tracking Distance will increase the distance between asteroids in belts. Use it when you want to make sure no asteroids overlap.
Speed: This one is easy... it�s the speed at which the belt orbits. By default it is set to 0.250. You can leave it at that or you can try to make it faster, but if those asteroids are supposed to have mines on them, make sure they don�t go too fast or your ships will have trouble harvesting from them.
Mist Id is the dust ring that appears with belts, you can adjust its color. By default this dust ring has a light blue color. Press on Material if you wish to change its color.
Num Per Orbital Track Min is the minimum amount of asteroids that will go on one track of your belt. Right now it�s set to 8, which is good for most cases, but you can increase it if you make a really big asteroid belt. Our Belt is small, so 8 is fine.
Num Per Orbital Track Max is similar to the above setting, but this time it�s for the maximum amount of asteroids. By default it is set to 28. Set this value to 12.
Then way down, passed all the disabled Min and Max options you will find Scale Min and Scale Max. These are used to set the size of your asteroids. The default min is 6.5, which is perfect for our belt. But the Max is too big. Reduce Scale Max to 7.5.
To set the amount of resource asteroids in your belt, you must adjust the Percentage found in the Ressources section. Set the Percentage amount to 0.04, this should give you one resource asteroid only. The Min and the Max are the amount of resources in each asteroid, Min 10000 and Max 100000 by default. You can set the amount as you wish.
Rotation, found just under the Ressources section, is used to adjust the rotation of each asteroid in your belt. By default, only Y has a value given of 0.05. This can be left the way it is. Don�t add too much speed to them or else you will have some problems harvesting the mines.
Make sure both Collisions and Interactive are checked or else ships will fly through the asteroids.
I think that�s it for the Asteroid belt, we will talk about this window more in detail later, but for now lets finish this map!
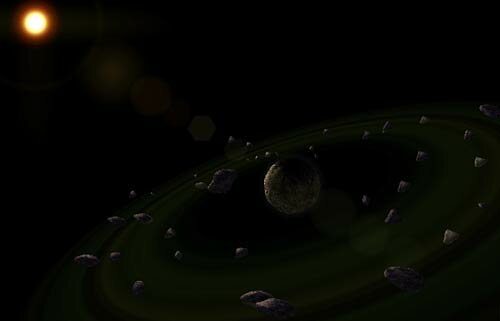
Click Create Asteroids. Your belt might look similar to this now.
I adjusted the lighting of the asteroids; they had too much blue in my opinion. You can also adjust the asteroids by following the same steps you took to modify the Moon�s lighting. You can play around with the Specular if you wish to add shine to those rocks.
Well, now we have a nice little belt around our moon, but if you look at the playable area in 3D (with show playable area enabled) it still has a lot of empty space that we could �spice up�. Adding another belt would be too big and end up going outside of the playable area. There is nothing wrong with asteroids going outside playable area, but you won�t be able to interact with those asteroids.
So let�s first build some asteroid clusters.
|
|
|
|
|
Copyright © 2002 Strategy First Inc. All Rights Reserved.
|
